
Windows Tips & Tricks

|
|
Fix Your Drive Icons in Windows XP
The Icon Issue
A perplexing dilemma of messed up drive icons on my computer drove me to put together this tip. In addition to the normal C: drive icon, my computer has a System Restore drive (which is actually just a partition of my C: drive), and six other drive icons associated with my two DVD drives and two SD/MMC/CF combo drives for memory sticks, etc.Figure 1
All of the drives work correctly, but the icons were messed up when viewed in My Computer (Figure 1), which made it difficult to tell which drive contained my valuable content. I eventually got tired of trying all of the various drives to see which one was associated with my memory stick.
I decided to remedy the situation and fix the icons. And so, seasoned Windows user that I am, I was sure the solution was only a few strategically placed clicks away. I proceeded to right-click on one of the offending drive icons, selected Properties from the shortcut menu, and what delights did I find...?
Doh! No option for changing the faulty icon. The Properties window had several promising tabs, but none of these presented the opportunity for selecting a new icon. This was getting serious. But I can be pretty serious myself, when I need to be. So I did some research and found out that to change drive icons, one needs to go "under the hood" and make changes to the registry.
Building a Better Icon
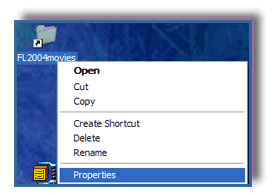
Figure 2
Before we go charging into the registry, let's find a more suitable icon for our drive. For this example, I'm fixing the icon for my DVD/RW drive, which is drive E: on my box. An easy way to search for icons, is to right-click on any shortcut, and go to properties. For example, on my Desktop I have a shortcut to some nice 2004 Florida movies. In this scenario, right-clicking saves the day!
From your Windows desktop, right-click on any shortcut, and click Properties (see Figure 2).
Figure 3
In the 'Shortcut' tab of the Properties window, click the Change Icon... button and you'll have a dialog box containing a plethora of icons for you to choose from. Starting at the top-left icon, count down each column, continuing at the top of the next column, and so on. The numbers in Figure 3 illustrate this. If you wish, you can select a different icon .dll file by using the browse button.
Remember your icon number!
On my computer, I had to subtract one from my final count - it appears that my first icon is corrupt in the .dll file.
Mens New York Giants Phil Simms Nike Royal Retired Player Game Jersey,Mens Green Bay Packers Nike Gold Speed Vent Performance Shorts,Men's Miami Dolphins Split Color Slippers.Youth New York Jets Black Reverb Resonate Jacket,Men's Oakland Raiders Pro Line Black Throwback II Big & Tall Long Sleeve T-Shirt,Dallas Cowboys Roar Duffel Bag.New England Patriots iPhone 5 Hard Case -,Mens New England Patriots Jonas Gray Nike Navy Blue Game Jersey,Mens San Francisco 49ers Eric Reid Nike Scarlet Game Jersey.Mens Seattle Seahawks Nike College Navy Ticket Long Sleeve T-Shirt,Men's Miami Dolphins Nike Aqua Legend Logo Long Sleeve Performance T-Shirt.Mens Detroit Lions Calvin Johnson Majestic Light Blue Hashmark II Synthetic Big & Tall T-Shirt,Men's Baltimore Ravens '47 Brand Black 20th Season Clean Up Adjustable Hat,Girls Youth Seattle Seahawks Pink Bubble Gum Jersey San Diego Chargers History.Youth New York Giants Odell Beckham Jr. Royal Player Name & Number Long Sleeve Shirt,Visit the official store of the NFL. Get the latest, officially licensed 2016 NFL Nike apparel, clothing, football merchandise, jerseys, New Era hats and other products for fans of all NFL teams. Pro football gear is available for men, women, and kids from all your favorite NFL teams..Buffalo Bills 2-Pack Lip Balm,Green Bay Packers Tervis Tumbler 24oz. Gridiron Wrap Tumbler,Pittsburgh Steelers WinCraft Plastic Star License Plate Cheap San Diego Chargers Jerseys Sale.Dallas Cowboys WinCraft Super Bowl VI Champions On the Fifty Pin,Women's Houston Texans '47 Brand Navy Sparkle Clean Up Adjustable Hat Cheap San Diego Chargers Nfl Jerseys Sale
Copy the full path of the .dll fileYou may need to paste this path into the registry key if the current drive icon resides in a different file.
Please Note: Before making changes to the registry, it's always a good idea to make a backup copy first. For instructions on registry backup procedures, check out the following article from Microsoft Support:
How to back up and restore the registry in Windows XP
How to back up and restore the registry in Windows XP
Don't Fear the Registry
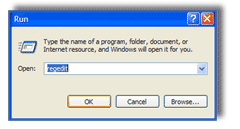
Figure 4
My Computer
-HKEY_LOCAL_MACHINE
--SOFTWARE
---Microsoft
----Windows
-----CurrentVersion
------Explorer
-------DriveIcons
--------[YourDriveLetter]
---------DefaultIcon
After backing up your registry and setting a system restore point, start the registry editor:-HKEY_LOCAL_MACHINE
--SOFTWARE
---Microsoft
----Windows
-----CurrentVersion
------Explorer
-------DriveIcons
--------[YourDriveLetter]
---------DefaultIcon
From your Windows desktop, click on Start, click Run, type regedit and click the OK button (see Figure 4).
In the left panel of the Registry Editor, navigate to the proper location for your drive. The blue box to the right lists the folders you'll need to select.
Verify that you have the correct path by checking the status bar at the bottom of the Registry Editor window. The path should be as follows (I've broken it into two lines for readability), where [YourDriveLetter] would be D, E, etc.: My Computer\HKEY_LOCAL_MACHINE\SOFTWARE\Microsoft\Windows
\CurrentVersion\Explorer\DriveIcons\[YourDriveLetter]\DefaultIcon
Change the Key, Change the World
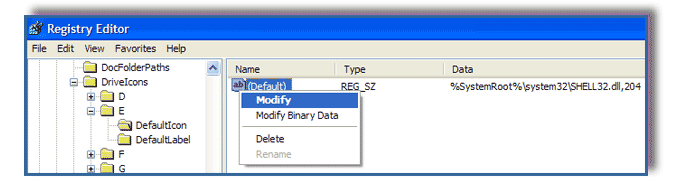
Figure 5
Within the Registry Editor, at the path indicated above, right-click on the default Key as shown and select Modify (Figure 5). If the icon .dll path/file is the same as the one you copied earlier, simply change the number at the very end to match the number of your preferred icon. Please note that "C:\WINDOWS\" from the shortcut properties .dll path earlier is the same as "%SystemRoot%\" indicated in the registry. If you need to change the icon .dll filename, only change the filename itself as opposed to the whole path.
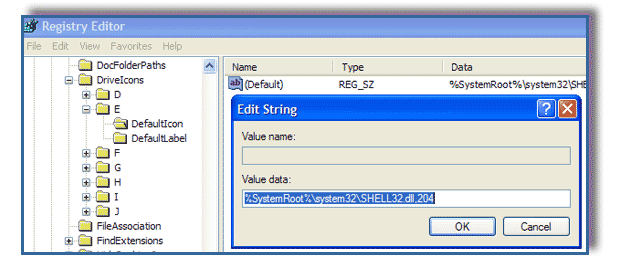
Figure 6
My Original Icon Registry Key: %SystemRoot%\system32\diconxp.dll,1
My Preferred New Icon:
Path: C:\WINDOWS\system32\SHELL32.dll
Number: 204
My New Icon Registry Key: %SystemRoot%\system32\SHELL32.dll,204
To change this registry key value, only the last bit of text (shown in green above) was changed. To accept the change, click OK, and exit the Registry Editor (Figure 6).
A Thing of Beauty
Of course, the finished product is always so wondrous to behold (Figure 7). All is right with the world once again.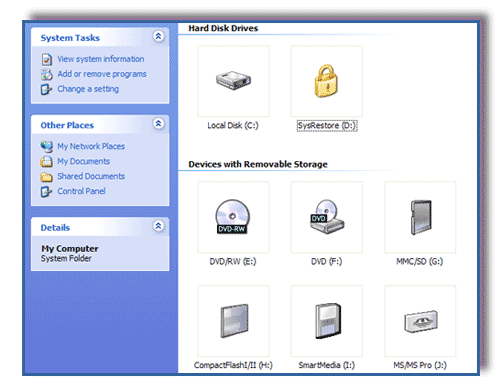
Figure 7